When a single cooking range burner fails at 7:30 PM on a Friday night, the cost is not just the repair invoice. It is the forty steaks that cannot be seared, the two line cooks standing idle while still on the clock, the comped desserts handed out to placate waiting tables, the one-star review posted before the customer even leaves, and the manager who now has to choose between closing the kitchen early or pushing a degraded menu onto a full dining room. That single burner failure — often a $40 igniter or a $15 gas valve — can cost a busy restaurant thousands of dollars in a single service shift.
Commercial kitchen downtime is rarely caused by catastrophic equipment explosions or dramatic mechanical failures. It is overwhelmingly caused by small, predictable problems that were never caught early: a heating element that ran 500 cycles past its service life, a water filter that was changed three months late, a gas line that was never pressure-tested after the last renovation, a hinge bolt that worked loose over six months of door slams until the door finally would not seal. The good news is that these failure modes are all preventable through structured planning — and that is what this guide covers.
This guide walks through a five-step framework to reduce equipment downtime in any commercial kitchen — from a 30-seat cafe to a multi-outlet central kitchen producing thousands of meals daily. The framework covers root cause identification, preventive maintenance scheduling, redundancy design, staff training, and vendor response management. For a broader view of how equipment selection itself affects long-term reliability, see HSYL's commercial kitchen equipment solutions overview.
Step 1: Identify the Four Root Causes of Kitchen Downtime
Before you can prevent downtime, you need to know where it actually comes from. In commercial kitchen environments, equipment downtime traces back to four root cause categories. Most kitchens experience all four, but the relative frequency depends on equipment age, staff training level, and how systematically maintenance is performed.
| Root Cause Category | Typical Failure Examples | Frequency in Untreated Kitchens | Prevention Difficulty |
|---|---|---|---|
| Utility Failures | Gas pressure drop, electrical breaker trip, water supply interruption, steam line leak | 20-30% of downtime events | Medium — requires facility-level planning and backup systems |
| Component Wear | Heating element burnout, gasket degradation, hinge bolt loosening, igniter failure, compressor seizure | 40-50% of downtime events | Low — predictable through scheduled replacement |
| Operational Errors | Door slammed off alignment, wrong cleaner used on stainless, water tank run dry causing dry-burn, foreign object dropped into mechanism | 15-25% of downtime events | Medium — requires staff training and standard operating procedures |
| Layout Bottlenecks | Equipment blocked by adjacent unit, no clearance for service access, ventilation inadequate causing overheating, single equipment serving multiple stations with no backup | 10-15% of downtime events | High — requires layout redesign or equipment repositioning |
Engineering Note: Most kitchens assume their downtime is dominated by component wear (the obvious cause) when in fact operational errors and layout bottlenecks often account for a larger share of cumulative downtime hours. A single misaligned door that takes 90 seconds to latch properly, repeated 40 times per day across a year, equals over 24 hours of cumulative productivity loss — equivalent to a full day of total kitchen shutdown, spread invisibly across the calendar.
The action from this step is simple: spend one week logging every downtime incident in your kitchen, categorized by these four root causes. The resulting distribution will tell you exactly where to focus your prevention investment first. Most operators are surprised by what they find.
Step 2: Build a Tiered Preventive Maintenance Schedule
Preventive maintenance is the single highest-return investment in downtime reduction. The principle is straightforward: replace components on a predictable schedule before they fail, rather than waiting for them to fail and then reacting. The challenge is that most kitchens either do no preventive maintenance at all (relying entirely on reactive repair) or apply a one-size-fits-all annual service that misses the actual failure cycles of different component types.
A proper preventive maintenance schedule tiers tasks by frequency, matching each tier to the actual wear pattern of the components being serviced:
| Frequency Tier | Task Types | Typical Components Addressed | Staff Assignment |
|---|---|---|---|
| Daily | Visual inspection, surface cleaning, water tank check, condensate drain verification | Door seals, exterior surfaces, water levels, drain pans | Line cook at open and close |
| Weekly | Deep cleaning, descaling, filter inspection, gas flame visual check | Heating elements, burner ports, water filters, ventilation hoods | Kitchen supervisor or designated cleaning shift |
| Monthly | Component inspection, gasket flexibility test, hinge bolt torque check, electrical connection tightening | Door hinges, silicone seals, heating element terminals, control panel wiring | Maintenance technician or trained supervisor |
| Quarterly | Internal component access, deep descaling, gas pressure verification, refrigerant level check | Boiler interiors, gas regulators, compressor systems, refrigeration circuits | External service technician or qualified in-house maintenance |
| Annual | Certification renewal, full disassembly inspection, component replacement based on service-life schedule, safety system recalibration | Flame-out protection devices, pressure relief valves, electrical insulation, structural integrity | Manufacturer-certified service partner |
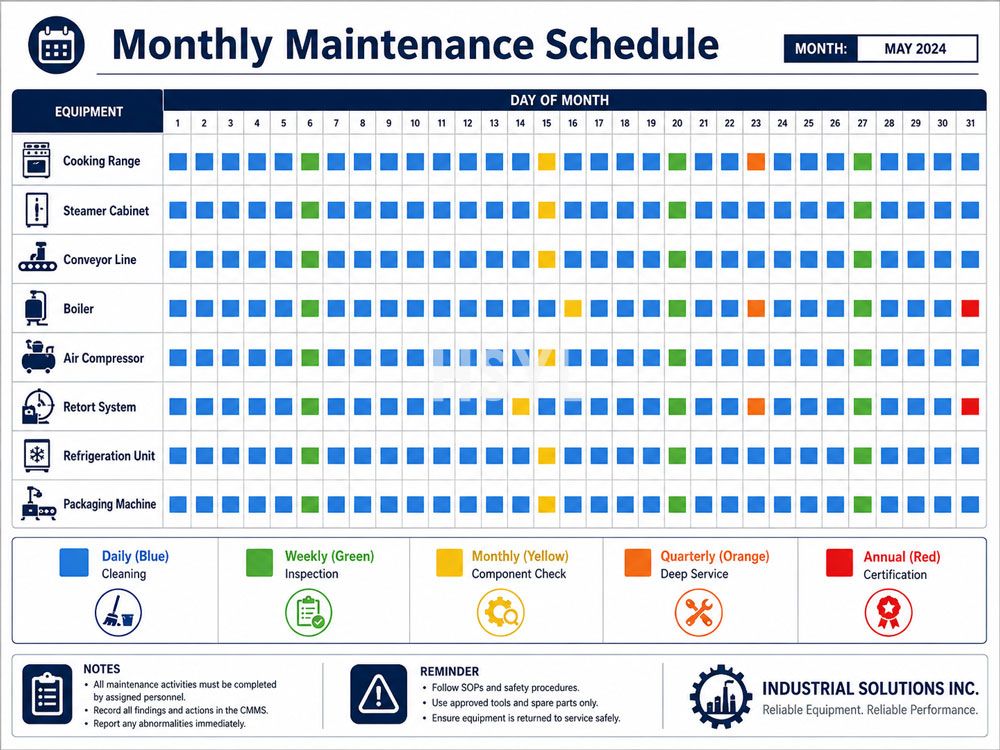
The schedule should be documented in writing, posted visibly in the kitchen, and reviewed at every shift handover. Equipment that includes built-in maintenance-friendly features — such as the AUTOFFILL water-shortage protection system on HSYL steamer cabinets, which prevents dry-burn damage automatically — reduces the daily and weekly burden by handling one of the most common damage modes internally, but does not eliminate the need for the higher-tier scheduled tasks.
Practical Tip: Create a one-page laminated card for each piece of equipment listing its specific daily, weekly, and monthly tasks. Hand the card to the staff member responsible and have them sign off after completing each task. A maintenance schedule that exists only in a manager's spreadsheet is effectively no maintenance schedule at all.
Step 3: Design Equipment Redundancy into Your Kitchen Architecture
Preventive maintenance reduces the frequency of failures, but it cannot eliminate them entirely. Components will eventually fail even under the best maintenance program — the question is what happens when they do. A kitchen with zero redundancy is a kitchen where a single component failure takes an entire cooking station offline. A kitchen designed with redundancy can absorb many failures without any visible service disruption.
Redundancy in commercial kitchens takes three forms, and the right choice depends on the equipment type, available space, and budget:
Form 1: Parallel Unit Redundancy
The simplest form: own two of the same equipment. If one fails, switch to the other. This is standard practice for critical-path equipment like primary cooking ranges and high-volume refrigeration. The downside is capital cost — you are buying twice the capacity you normally need. Best suited for equipment where a single unit cannot meet peak demand anyway, so the second unit is also productive capacity during normal operation.
Form 2: Fuel Source Diversification
For heating equipment, redundancy can mean having both gas and electric options available. A kitchen running an all-electric steamer lineup is fully shut down during a power outage; a kitchen with at least one gas-powered unit can continue limited steam production. This is where equipment like the Gas Steamer Cabinet (EB-CNGS Series) earns its place — not because gas is inherently better than electric, but because it provides operational continuity when electricity is unavailable. For kitchens in regions with unreliable grid power or frequent outage events, fuel diversification is the most cost-effective redundancy strategy available.
Form 3: Mode Switching Redundancy
Some equipment can switch between operating modes internally without requiring a second unit. The Intelligent Steamer Cabinet (EBI-DRS Series) exemplifies this approach: it can operate on external facility steam when the central boiler is running, and switch to its built-in electric boiler when the steam supply is interrupted for maintenance or repair. One cabinet, two steam sources, continuous operation through either utility failure. This is the most space-efficient form of redundancy because it requires no additional floor footprint — the redundancy is engineered into the single unit.
Engineering Note: Mode switching redundancy is not limited to steam equipment. Any cooking system that can accept multiple energy inputs (gas plus electric, electric plus external steam, single-phase plus three-phase with automatic transfer) provides a measure of redundancy without requiring duplicate equipment. When specifying new kitchen equipment, ask the supplier explicitly what mode-switching or multi-input capabilities are available — this is often more valuable than a slightly higher capacity rating on a single-mode unit.
Step 4: Train Staff on Early Warning Detection
Equipment does not typically fail without warning. There are almost always early signals — a sound change, a temperature fluctuation, a slower cycle time, a minor leak, an unusual smell — that precede the actual failure by hours, days, or sometimes weeks. The problem is that most kitchen staff are not trained to recognize these signals, and the signals are normalized until the failure becomes catastrophic.
An effective early warning detection program teaches staff to recognize four categories of cues and to report them immediately rather than working around them:
| Cue Category | What to Listen and Watch For | Typical Implication |
|---|---|---|
| Sound Cues | New rattling, grinding, hissing, clicking, humming changes, unusual compressor noise, gas flame sound changes | Loose component, bearing wear, gas leak, electrical arcing, flame instability |
| Visual Cues | Condensation where there should be none, discoloration on stainless surfaces, slow door closure, flame color change from blue to yellow, water pooling under unit | Seal failure, heat damage, hinge wear, incomplete combustion, drain blockage |
| Performance Cues | Longer preheat times, inconsistent cooking results, steam pressure lower than setpoint, temperature overshoot or undershoot, longer cycle completion times | Heating element degradation, scale buildup, thermostat drift, control system issue |
| Smell Cues | Burning plastic or rubber, gas odor even when off, unusual chemical smell, hot metal smell | Wire insulation breakdown, gas leak, refrigerant leak, overheating component |
The training program should include explicit instruction that reporting an early warning cue is rewarded, not punished. Many kitchen cultures implicitly treat "working through" equipment quirks as a sign of competence — which guarantees that minor issues become major failures. Shift the culture so that the line cook who reports a slight rattle in the steamer door is thanked, not seen as creating extra work.
Step 5: Establish Vendor Response and Spare Parts Protocol
Even with preventive maintenance, redundancy, and early warning detection, some equipment failures will still occur and require professional service response. The speed of that response — measured in hours, not days — is the difference between a brief service interruption and a multi-day kitchen closure. The variables that determine response speed are almost entirely under your control before any failure happens.
What to Establish Before Any Failure Occurs
- Service contract terms in writing: Maximum response time commitment (typically 4 hours for critical equipment, 24 hours for non-critical), after-hours availability, weekend coverage scope, and escalation path if the primary technician is unavailable.
- Spare parts inventory on-site: High-failure-rate components that are inexpensive and easy to swap should be stocked in your kitchen — igniters, heating element gaskets, door seals, water filters, hinge bolts, fuses. The cost of holding these parts is trivial compared to the cost of waiting 24 hours for a technician to source and deliver a $15 component.
- Equipment documentation accessible: Model number, serial number, installation date, warranty status, and service history for every piece of equipment — accessible to whoever answers the phone when a failure occurs, not buried in a manager's office filing cabinet.
- Backup vendor relationships: Do not rely on a single service provider for all equipment. Identify at least two qualified service companies in your region, and confirm both can service your critical equipment brands. If the primary vendor is overloaded during a heat wave or holiday weekend, the secondary vendor becomes your safety net.
- Post-cleaning and post-installation verification: Equipment that integrates with cleaning workflows — such as commercial washing and cleaning machines — should have documented post-cleaning verification steps so that subtle damage from cleaning chemicals or water exposure is caught before the next service cycle.
The Cost Math: Why Prevention Always Wins
The economic case for downtime prevention is not subtle. Consider a mid-sized full-service restaurant with average dinner revenue of $4,000 per evening. A single cooking range failure that takes one of four stations offline for one evening does not reduce revenue by 25% — it typically reduces revenue by 35-45% because the entire kitchen slows down, ticket times extend beyond customer tolerance, and a percentage of tables walk out or order lower-value items. The single-evening revenue loss easily reaches $1,500-$1,800.
Compare this to the annual cost of a comprehensive preventive maintenance program for the same kitchen: typically $2,000-$4,000 including labor, replacement parts, and one or two service technician visits. The program pays for itself if it prevents even one or two major downtime events per year — and a properly executed program typically prevents five to ten. The return on investment is not marginal; it is structural.
| Kitchen Type | Estimated Cost of One Major Downtime Event | Annual Preventive Maintenance Investment | Break-Even Events Per Year |
|---|---|---|---|
| Quick Service Restaurant (single unit) | $800 - $1,500 | $1,200 - $2,000 | 1.3 - 2.5 events |
| Full Service Restaurant (150 seats) | $1,500 - $3,500 | $2,000 - $4,000 | 1.1 - 2.7 events |
| Central Kitchen (5,000+ meals/day) | $5,000 - $15,000 | $6,000 - $12,000 | 0.8 - 2.4 events |
| Hotel Banquet Operation | $3,000 - $8,000 | $3,500 - $7,000 | 0.9 - 2.3 events |
Value Angle: The break-even analysis above only counts direct revenue loss. It does not include the secondary costs of downtime — staff labor paid during idle periods, expedited shipping fees for replacement parts, customer retention impact from negative reviews, manager overtime for crisis coordination, or the cost of emergency temporary equipment rental. Including these factors typically halves the break-even threshold, making preventive maintenance profitable even in kitchens that experience only one major downtime event every two years.
For kitchens planning a new facility or major renovation, downtime prevention should be designed in from the equipment specification stage rather than retrofitted later. The food factory engineering layout and cost guide covers how equipment placement, utility routing, and service access clearances affect long-term maintainability — decisions made during layout planning that determine whether routine maintenance takes 20 minutes or 2 hours for the life of the kitchen.
Planning Resources for Downtime-Resistant Kitchens
Building a kitchen that resists downtime requires the right combination of equipment selection, layout planning, and operational protocol. These resources cover the broader context around each dimension:
- Complete commercial kitchen equipment solutions overview — How individual machines integrate into a workflow that minimizes single points of failure and supports maintainable operation across the full cooking line.
- Intelligent Steamer Cabinet with dual-mode steam source — Example of mode-switching redundancy built into a single unit, accepting both external facility steam and built-in electric boiler operation for continuous uptime.
- Gas Steamer Cabinet with dual-fuel capability — Fuel-source diversification example for kitchens requiring operational continuity during electrical grid interruptions.
- Food factory engineering layout and cost guide — How layout decisions made during facility planning affect service access, ventilation, utility routing, and long-term maintainability.
Frequently Asked Questions
How much does kitchen downtime typically cost per hour?
What is the most common cause of commercial kitchen equipment failure?
How often should commercial kitchen equipment be serviced?
Should I buy backup kitchen equipment for redundancy?
How do I train kitchen staff to detect equipment problems early?
What spare parts should I keep on-site for kitchen equipment?
How do I choose a kitchen equipment service vendor?
Can preventive maintenance eliminate all kitchen downtime?
Does equipment layout affect downtime frequency?
Related Articles


Get professional consultation
Do you have any questions or need technical support regarding the content of this article? Fill out the form below, and our expert team will provide you with professional solutions.