What Makes a Canned Meat Line Layout Different
A canned meat production line has a processing challenge that fish and vegetable canning lines do not: meat must be cooked before it enters the can, then cooked again inside the can during retort sterilization. The first cooking step — braising, roasting, or steam-cooking — develops the product's flavour, texture, and appearance. The second cooking step — retort sterilization — makes it shelf-stable. The layout must accommodate two separate thermal processes with different equipment, different utility demands, and different hygiene requirements, connected by filling and seaming stages that must operate at the same line speed as both the upstream cooking and the downstream retort.

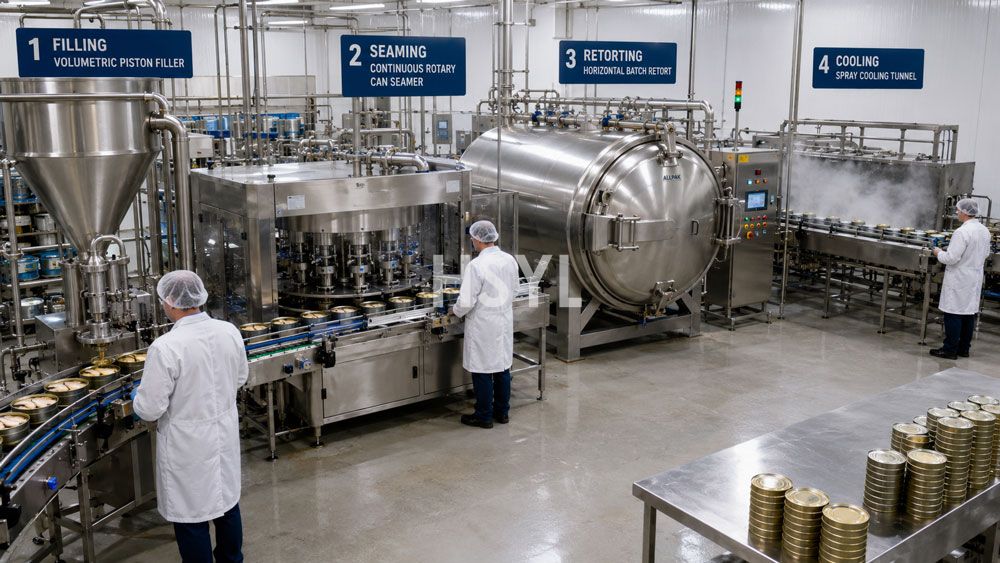
This article walks through the layout of a canned meat production line for three product types: luncheon meat (emulsified, set in a rectangular can), corned beef and cooked shredded meat (fibrous, packed in trapezoidal or round cans), and braised meat in sauce (chunks in gravy, packed in round cans). The layout principles apply to beef, pork, poultry, and mixed-meat products. The line is organized as a straight line with five zones: raw meat receiving and preparation, cooking and thermal processing, filling and seaming, retort sterilization, and post-retort packing. For the broader factory-layout framework covering all zones beyond the production line, see the fish canning equivalent for methodology transfer. For specific line cost factors, see the canning line cost analysis.
Raw Material Conditions That Shape the Layout
The layout starts with the meat, not the equipment. Three raw-material variables determine everything downstream:
- Meat type and state: fresh chilled meat (0–4°C), frozen meat blocks (−18°C), or frozen individually-packed portions. Frozen meat requires a thawing stage — either a controlled-temperature thawing room (12–24 hours for blocks) or a microwave or radio-frequency thawing tunnel for higher throughput. The thawing area must be adjacent to the raw processing zone, with product moving from frozen storage through thawing to processing in one direction.
- Product form: luncheon meat is an emulsified product — meat, fat, water, starch, and seasoning are ground and mixed into a fine paste that sets during cooking. Corned beef is a fibrous, shredded product — cooked meat chunks are shredded and packed with minimal emulsification. Braised meat in sauce is a chunks-in-liquid product — meat pieces are braised, portioned into cans, and covered with sauce. Each product form requires different equipment: a bowl cutter and emulsifier for luncheon meat; a shredder and mixer for corned beef; a portioning station and sauce doser for braised meat.
- Can format and fill weight: luncheon meat uses rectangular or oval cans (200–340 g); corned beef uses trapezoidal or round cans (200–340 g); braised meat uses round cans (200–400 g). Each can shape requires specific filling nozzles, can-guide rails, and seamer tooling. A line that must run both rectangular and round cans needs format-changeover stations and quick-change seamer tooling — this adds capital cost but provides production flexibility.
The most expensive layout error in meat canning: designing for one product form and discovering later that market demand requires three. Emulsified, shredded, and chunks-in-sauce products share a retort and post-retort line but require separate upstream processing and filling equipment. The layout must either be single-product or designed with parallel processing branches converging at a shared filling and retort line.
Step-by-Step Layout Flow: Five Zones from Raw Meat to Sterilized Product
Zone 1: Raw Meat Receiving, Thawing, and Preparation
Fresh meat arrives in chilled containers and moves directly into the processing line. Frozen meat moves into a freezer holding area (−18°C), then to a controlled thawing room or thawing tunnel before processing. The thawing room must maintain 0–4°C ambient with controlled humidity and air circulation — ambient-temperature thawing is a HACCP non-conformance for meat products. After thawing, meat moves to preparation: trimming (removal of excess fat, connective tissue, and any bone fragments), cutting to grinder-size pieces, and weighing for batch formulation.
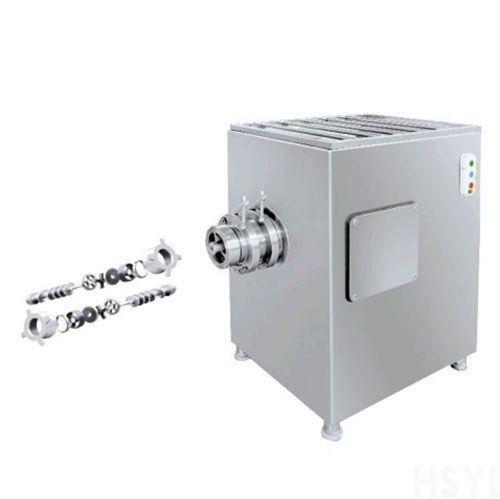
Equipment in this zone: receiving inspection table with scale, meat thermometers, freezer holding room, thawing room with temperature monitoring, trimming tables (stainless steel, sloped to drains), meat grinder or dicer, batch-weighing station with recipe-scale system. Layout requirements: the raw meat zone must be physically separated from all downstream zones by a wall. Temperature must be maintained at 10–12°C maximum — this is a temperature-controlled processing room, not an ambient-temperature factory floor. Personnel flow is one-way: workers change into dedicated protective clothing at the zone entry, work within the zone, and exit through a boot-wash and hand-wash station. They do not re-enter cooked-product zones without a complete clothing change.
Zone 2: Cooking and Thermal Processing
This is where canned meat processing diverges from canned fish. Meat is cooked before canning — the cooking step develops the product's final texture, flavour, and appearance, and partially reduces the microbial load before retort. The cooking method depends on product type:
- Luncheon meat: the emulsified meat paste is not pre-cooked before filling — it is filled raw into cans and cooked entirely during retort. However, the emulsion preparation (bowl cutter, vacuum mixer, emulsifier) is a continuous mixing process that must feed the filler at a consistent rate. Emulsion temperature must not exceed 12°C during mixing — the bowl cutter and emulsifier area should be temperature-controlled. This is the only major canned meat product where filling occurs before cooking.
- Corned beef / cooked shredded meat: meat chunks are pre-cooked in steam-jacketed kettles or continuous steam cookers until tender (core temperature 75°C+). After cooking, the meat is cooled, shredded, and mixed with seasoning and binder. Cooking generates significant steam and condensate — the kettle or cooker area requires overhead exhaust, floor drainage, and a condensate-return system.
- Braised meat in sauce: meat pieces are braised in tilting braising pans or continuous braising tunnels with controlled temperature and humidity. The sauce is prepared separately in jacketed kettles and held in heated buffer tanks. After braising, meat pieces are cooled and portioned; the sauce is dosed into the can at filling.
Equipment in this zone: steam-jacketed kettles or continuous cookers, tilting braising pans, cooling tables or blast chiller, meat shredder, bowl cutter (luncheon meat), vacuum mixer, emulsifier (luncheon meat), sauce-preparation kettles with buffer tanks. Layout requirements: this zone is the bridge between raw processing and the hygiene-controlled filling area. Cooked product must exit this zone and enter Zone 3 without crossing the path of raw meat entering Zone 2. The cooking equipment generates the largest steam and hot-water demand on the line — utilities must be routed from the plant boiler and chiller systems to this zone with capacity for simultaneous operation of all cooking vessels.

Zone 3: Filling and Seaming
Cooked or emulsified meat enters the filling zone — a high-hygiene area. The filling method depends on product type:
- Luncheon meat: the emulsified paste is pumped from the vacuum mixer or buffer hopper to a piston filler. The filler deposits a precise weight of emulsion into each can. Fill accuracy is critical — luncheon meat emulsion is viscous and compressible, and entrapped air in the emulsion causes fill-weight variation. A vacuum deaerator between the mixer and filler reduces entrapped air and improves fill consistency.
- Corned beef: shredded cooked meat is deposited into cans by a volumetric or weight-based filler. The meat is fibrous and does not flow — mechanical agitators in the filler hopper are required to maintain consistent feed to the filling head.
- Braised meat in sauce: meat pieces are manually or automatically portioned into cans on a filling conveyor. The sauce is dosed into the can after solid fill — either by a piston doser for thick sauce or a volumetric doser for thin sauce. The ratio of solid meat to sauce is a product specification that the filling station must maintain consistently.
After filling, each can passes over a check-weigher and then enters the seamer. The seamer applies the can lid and forms the double seam — the hermetic seal that maintains sterility through retort and during the product's shelf life. The seamer must be mounted on an independent vibration-damping base, isolated from the filler, because filler vibration transmitted to the seamer produces inconsistent seam dimensions that may pass visual inspection but fail during retort or shelf-life testing.
Sealed cans pass through a can washer that removes product residue from the exterior surface. Unwashed cans carry protein, fat, or sauce residue into the retort, where it bakes onto the can surface at sterilization temperature.
Layout requirements: the filling zone is a controlled-hygiene area with positive air pressure relative to adjacent zones. Air flows from the filling room outward. Personnel entry requires a hygiene lock — hand-wash, boot-wash, and protective clothing change. Can supply (empty cans from the depalletizer and can washer) enters the filling zone from the side, not through the raw-meat path.

Zone 4: Retort Sterilization
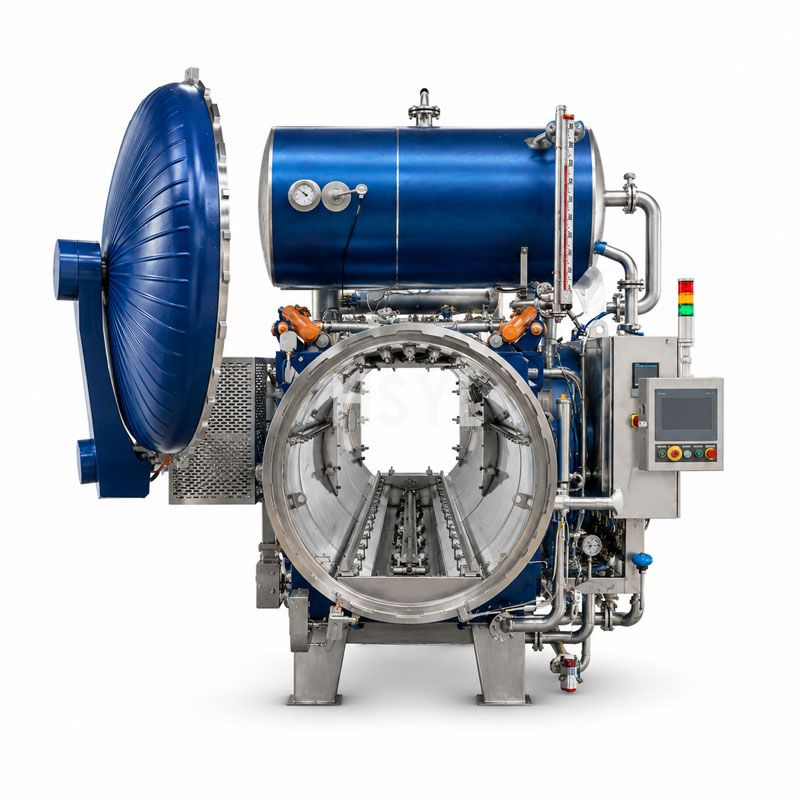
Washed, sealed cans are loaded into retort baskets and transferred into the retort — a pressure vessel that sterilizes the product at 116–121°C. Canned meat products typically require higher F₀ values (sterilization lethality) than canned fish — often 6–12 minutes for luncheon meat and corned beef, compared to 4–8 minutes for sardines. This is because meat products have higher initial microbial loads and the product density and can dimensions affect heat penetration to the cold point (the geometric centre of the can, which is the last point to reach sterilization temperature).
Retort type selection affects the layout: saturated-steam retorts are the most common for meat canning, but water-spray and full-water-immersion retorts provide more uniform heating for dense products in large cans. Steam retorts require a validated vent schedule — the venting procedure that removes air from the retort before pressurization, because trapped air creates cold spots that prevent sterilization. The layout must provide operator access to the retort vent valves and chart recorder.
Layout requirements for the retort room are the same as for fish canning — and are non-negotiable for any canned food operation:
- Physical separation from all pre-retort zones. Double-door pass-through retorts embedded in a dividing wall are preferred — raw-side loading, sterile-side unloading.
- Air flow from the sterile side toward the raw side — positive pressure on the sterile side.
- No product path may bypass the retort. Chemical indicator tape on every basket for single-door retorts.
- Steam, water, compressed air, and electrical supply routed overhead and dropped vertically to each retort — no utilities crossing the floor.
- Retort-room floor rated for thermal shock from basket transfers, sloped to drains with high-temperature-rated drainage.
For detailed retort engineering, see the retort sterilizer design factors guide.
Zone 5: Post-Retort Cooling, Drying, Labeling, and Packing
After retort, sterilized cans exit on the sterile side. They are cooled — either in the retort (pressure cooling) or in a separate cooling canal — to below 40°C. Dense meat products in large cans cool more slowly than fish products — cooling time must be validated for the specific product and can size. Inadequate cooling causes two problems: residual heat continues to cook the product (over-processing, texture degradation) and cans above 40°C will not accept label adhesive and are at risk of external corrosion during storage.
Cooled cans are dried, labeled, date-coded, and packed into cartons or shrink-wrapped trays. Rectangular luncheon meat cans present a specific labeling challenge — the flat sides accept paper labels, but the rectangular shape requires labelers designed for non-cylindrical containers. Round meat cans use standard rotary labelers.
Layout requirements: the post-retort area is a clean, controlled-environment zone. Cans are sterile and must be protected from physical damage — conveyor drops, can-to-can impacts, and excessive rail pressure can all compromise seam integrity. Post-retort conveyors must be designed for gentle can handling. The packing area should be temperature and humidity controlled to prevent condensation on cooled cans.

Equipment Summary by Zone
| Zone | Luncheon Meat | Corned Beef / Shredded | Braised Meat in Sauce |
|---|---|---|---|
| 1. Raw prep | Grinder, weigher | Grinder, weigher | Grinder, weigher, trim station |
| 2. Cooking | Bowl cutter, vacuum mixer, emulsifier | Steam kettle, cooler, shredder, mixer | Braising pan/tunnel, sauce kettle, cooler |
| 3. Filling | Piston filler, vacuum deaerator | Volumetric filler with agitator | Portion station + sauce doser |
| 3. Seaming | Can seamer (rectangular tooling) | Can seamer (trapezoidal/round) | Can seamer (round tooling) |
| 4. Retort | Steam or water-spray retort; F₀ 6–12 min; basket loading | ||
| 5. Post-retort | Cooling canal, can dryer, labeler (rectangular or rotary), date coder, carton packer | ||
Critical Control Points
- CCP 1 — Retort sterilization: the process step that eliminates Clostridium botulinum spores. Temperature, pressure, time, and F₀ value must be continuously recorded. The retort control system must have calibrated instrumentation and an automatic shutdown on deviation outside critical limits. The layout must make it physically impossible for an un-retorted basket to reach the sterile side.
- CCP 2 — Seam integrity: the double seam is the barrier against post-sterilization recontamination. Seam inspection — visual examination and teardown measurement at defined frequency — must be performed at a station immediately after the seamer. Cans with defective seams must be diverted before entering the retort basket.
- CCP 3 — Cooking temperature (corned beef and braised meat): for products pre-cooked before canning, the cooking step must achieve a core temperature of 75°C+ with validated holding time. The cooking vessel must have calibrated temperature probes and an automatic recording system. This CCP is upstream of retort but equally critical — retort cannot compensate for inadequate pre-cooking of a dense meat product.
- CCP 4 — Emulsion temperature (luncheon meat): meat emulsion temperature must not exceed 12°C during mixing and filling. Elevated emulsion temperature permits microbial growth before retort and degrades emulsion stability, affecting product texture after sterilization. Temperature probes in the bowl cutter and buffer hopper with alarm thresholds are required.
Capacity Bottlenecks
- Retort capacity: the retort is the universal bottleneck in meat canning because it is a batch process. Retort cycle time for meat products (60–90 minutes including come-up, hold, and cooling) is longer than for fish. The number of retort vessels, baskets per vessel, and cans per basket determine the maximum daily throughput. Retort count must be sized for peak production, not average — a line that can fill 120 cans per minute but has retort capacity for only 80 cans per minute will accumulate un-retorted product that cannot be held indefinitely.
- Pre-cooking capacity (corned beef/braised meat): the steam kettles, braising pans, or continuous cookers are the upstream bottleneck. Cooking time is product-dependent and cannot be accelerated without affecting product quality. Pre-cooking equipment count must match the filler speed — a filler running at 100 cans per minute with a cooking cycle of 60 minutes per batch requires enough cooking vessels to feed the filler continuously.
- Emulsion preparation (luncheon meat): bowl cutter and emulsifier cycle time determines how many filling heads can be supplied. The buffer hopper between emulsifier and filler must provide enough emulsion volume to absorb the emulsifier cycle — typically 10–15 minutes of filler consumption.
- Cooling capacity: post-retort cooling is the downstream bottleneck. Dense meat products in large cans cool slowly. Cooling-water temperature, flow rate, and canal dwell time must be validated for the largest can format running at maximum line speed. Insufficient cooling capacity creates a backlog of uncooled product at the retort exit.
Planning Inputs for a Canned Meat Line Layout
Before finalizing a layout, confirm:
- Product type(s) — luncheon meat, corned beef, braised meat, or mixed — determines which processing branches are required;
- Meat species and fresh/frozen state — determines thawing and grinding equipment;
- Target throughput in cans per minute at the seamer;
- Can format(s) — shape, dimensions, material — every format change affects filler, seamer, and conveyor specifications;
- Target F₀ value and retort type — determines retort cycle time and vessel count;
- Available utilities — steam pressure and capacity, cooling-water temperature and flow rate, compressed air, electrical supply;
- Building dimensions — a straight-line meat canning layout with pre-cooking requires more building length than a fish canning line of equivalent capacity;
- Destination country regulations — meat products have specific import and food-safety requirements that may affect permitted ingredients, retort-validation protocols, and labelling.
Conclusion
A canned meat production line layout is defined by the product's need for two thermal processes — pre-canning cooking and in-can retort sterilization — connected by filling and seaming stages that must synchronize with both. The layout must accommodate the specific product form: luncheon meat moves from emulsifier to filler as a paste; corned beef moves from kettle to shredder to filler as fibres; braised meat moves from braising pan to portioning station as chunks. These three product flows converge at a shared seaming and retort line — the layout's centre of gravity.
When planning a canned meat line, start with the retort capacity. It determines the line speed. Then work backward: specify filling and seaming equipment to match retort throughput, specify pre-cooking equipment to feed the filler continuously, and specify raw preparation equipment to supply the cooking stage. A line designed in this sequence functions. If you are planning a canned meat production line, contact the engineering team with your product type, target throughput, can format, and building dimensions.
Get professional consultation
Do you have any questions or need technical support regarding the content of this article? Fill out the form below, and our expert team will provide you with professional solutions.